Showing posts with label Wedding. Show all posts
Wednesday, February 3, 2016
Blue Wedding card
Just a quick post this afternoon, a wedding card that I just whipped up because of the new FMS 222!
It took me 20 minutes...honestly! I already had my loopy panel on the desk and pearl embossed this old SU roses image 6 times, overlapping in the shape of a heart. I sponged Weathered Wood and Tumbled Glass DI over and then cut a few vellum strips in white and blue and black heat embossed the SU sentiment. It was a fun card to make and add to my stash!
Thanks, as always, for your visits!
Chriss
Wednesday, September 10, 2014
Peony Garden stencilled background
Another post today! I am making cards left right and center today it seems. This one is for the Simon Says Stamp Wednesday challenge for STAMPtember make your own background.
Another goodie that I ordered from SSS is the newish Memory Box Peony Garden stencil. Brand new and I am also entering into Darnell's NBUS #2
So happy for all of these wonderful challenges!
I made my background by spongeing on 3 colours, SU Pistachio Pudding, PTI Melonberry and Staz On Dove Grey. I layered onto a Smokey Slate Card front and used Smokey Slate ink for the PTI sentiment. The ampersand was cut twice, once in Smokey Slate and once in SU silver card stock. I layered together, slightly offset and that is this simple wedding card.
Thanks again for your visits,
Hugs-Chriss
Friday, July 11, 2014
Summery Wedding hearts
Happy Friday! I hope that everyone has had a great week and an even better upcoming weekend!
I needed another wedding card for a modern couple, nothing too formal and created this card. I will be offering over at a couple of challenges, and CASual Fridays #133 (because I am using hearts) and my colours fit in for the Card Concept colour challenge. Yay!
It is a pretty straight forward design. I cut out a few of the PTI Scribbles dies in Aqua and white. I also die cut two pairs of hearts and a large PTI ampersand. The ampersand is stacked for more definition. The hearts are popped up on dimensional foam and the card front has texture from an embossing folder.
I hope to be back during the weekend with another post as I won't be around next week. We have a little holiday to take on Goat Island in Newport RI. We are looking forward to the cooler temps!
Thanks for stopping by and taking a peek!
Hugs-Chriss
I needed another wedding card for a modern couple, nothing too formal and created this card. I will be offering over at a couple of challenges, and CASual Fridays #133 (because I am using hearts) and my colours fit in for the Card Concept colour challenge. Yay!
It is a pretty straight forward design. I cut out a few of the PTI Scribbles dies in Aqua and white. I also die cut two pairs of hearts and a large PTI ampersand. The ampersand is stacked for more definition. The hearts are popped up on dimensional foam and the card front has texture from an embossing folder.
I hope to be back during the weekend with another post as I won't be around next week. We have a little holiday to take on Goat Island in Newport RI. We are looking forward to the cooler temps!
Thanks for stopping by and taking a peek!
Hugs-Chriss
Saturday, June 21, 2014
AAA-Wedding Day
Good morning! I have a card today for another new to me challenge over at AAA Cards. This is already their 7th challenge...where have I been?
The DT cards are awesome and the game 7 challenge is to use embossing. And pink. Not a favourite colour of mine, so this was a challenge! I embossed this pretty Memory Box wreath in white onto PTI smokey shadow card stock, cut the panel to a smaller size and layered over a pink card front where, at the bottom, I had dry embossed this little scalloped edge. I also heat embossed in white onto velum two sentiments from the PTI set Embellished Elegance. I finished it off with a cute little die cut flower from a Memory Box poinsettia die and added a white seed beed to the center and added 3 more above for a little more interest to the card. Quite simple. I think I will make some more of these, but in different colours!
Thanks for taking a peek and I hope that you have a wonderful weekend!
Chriss
The DT cards are awesome and the game 7 challenge is to use embossing. And pink. Not a favourite colour of mine, so this was a challenge! I embossed this pretty Memory Box wreath in white onto PTI smokey shadow card stock, cut the panel to a smaller size and layered over a pink card front where, at the bottom, I had dry embossed this little scalloped edge. I also heat embossed in white onto velum two sentiments from the PTI set Embellished Elegance. I finished it off with a cute little die cut flower from a Memory Box poinsettia die and added a white seed beed to the center and added 3 more above for a little more interest to the card. Quite simple. I think I will make some more of these, but in different colours!
Thanks for taking a peek and I hope that you have a wonderful weekend!
Chriss
Thursday, May 29, 2014
wedding Clean and Layered
Here is my CAL wedding card for the Card Concept #11
It has been a while since I have been able to post anything...
But I have tendered my resignation at the day job and will be focusing on family, home and cards! I am so excited :))
My card today features new PTI button stacks flowers, leaves and sentiments from Embellished Elegance, Lemon Tart PTI card stock and my last sheet of SU Going Gray :( I used black ink and black seed beads for the flower centers.
I am so ready to craft on a daily basis! YAY!
It has been a while since I have been able to post anything...
But I have tendered my resignation at the day job and will be focusing on family, home and cards! I am so excited :))
My card today features new PTI button stacks flowers, leaves and sentiments from Embellished Elegance, Lemon Tart PTI card stock and my last sheet of SU Going Gray :( I used black ink and black seed beads for the flower centers.
I am so ready to craft on a daily basis! YAY!
Here is the Card Concept colours challenge.

Thanks for taking a peek!
Chriss
Thursday, April 3, 2014
Scribbled & Stitched Mr. & Mrs.
While looking at this post and cards on Ardyth's blog Tuesday after work, I was so inspired to make this card that evening and showing it today. I Loved Aryth's use of fun colours for the birthday card and then the gold embossed card...gorgeous! I love making wedding cards and this one has a red, black and white theme to it. I stitched in black thread, straight and zig- zag to define the central sentiment. I used sparkly red stickers and I die cut a large ampersand from PTI in black CS. The scribbled circles from PTI were stamped in white and then heat embossed with white powder on velum CS. A pinch of red sequins in two sizes finish off the card. I made this for fun, but I see that there is a Stitching, Fauxl or Real challenge #30 going on at CAS on Sundays. Lucky me to be able to link this up for the challenge!
Thanks for taking a peek-Chriss
Saturday, October 19, 2013
CTS #50 - Wedding Doves and 2 Christmas cards
(Moxie Fab World card is in this post after this card)
Happy Saturday! Another week down, only how many days 'til Thanksgiving and Christmas...I had better get into gear, overdrive. My this year is a flyin'.
I based today's card selection on the sketch over at CTS#50 and have had fun making different themed creations this afternoon.
The sketch is a really good one, allowing lots and lots of possibilities. My first card, a wedding themed yellow and grey uses patterned paper from Authentique and Martha Stewart's dove punch. I placed a heart in between the two birds, seems appropriate right?
I have really wanted to try the chalkboard technique that I have seen really pretty Christmas cards created with this technique, and I will try my hand with some Christmas stamps that I think will work quite well, but in the meantime, what to use for this wedding card. Well, I inked up a Memory Box medallion and heart die with PTI white snow (like a craft ink) and ran them thru the Cuttle bug with the spongey tan mat underneath all. I like the results, kind of how I hoped it would look. The congratulations sentiment from SU Bitty Banners finishes it off. Do you think I should add some white sequins?

My next two cards are Holiday themed and were very easy to make, except for the colouring on the cupcake-that took a while!
I have used the Crate collection Sleigh Ride that I am using all up, such a different collection of themes and it is making me think outside of the box :))
I tried my hand agin with the chalkboard embossing technique (well I don't know if this is actually a technique...but I imagine that I am not the first to try this!) and the same MemoryBox die, but with some of the centers pushed out.
I made a circle frame on the front of my card and layered the backdrop with a very close to matching sage/teal linen texture card stock that I had in my stash. The little snowman is from the Crate collection as is the velum sentiment. I added the polka dotted washi tape that you have been seeing here of late (don't worry, it is a small roll :) to create a little balance and to add a little more of the drama with the black trees in the patterned paper. I am also offering this up for the Moxie Fab World Handmade Cards-Ready-Made Embellishments challenge.
This little cutie cupcake has been a favourite of mine since it first premiered at Ellen Hutson's way back when...a Karen Lockhart holly and berry cupcake stamp. I coloured with Copic markers, added some Sakura stardust garnet colour to the berries and framed up and then placed a MemoryBox die underneath. The chevron paper is from...you guessed it-Crate! and the sentiment is Papertrey Ink from the Love Lies Here Holiday version.
Thanks so very much for taking a peek and I have enjoyed all of the very, very sweet comments-Thanks so much!
hugs-Chriss
Happy Saturday! Another week down, only how many days 'til Thanksgiving and Christmas...I had better get into gear, overdrive. My this year is a flyin'.
I based today's card selection on the sketch over at CTS#50 and have had fun making different themed creations this afternoon.
The sketch is a really good one, allowing lots and lots of possibilities. My first card, a wedding themed yellow and grey uses patterned paper from Authentique and Martha Stewart's dove punch. I placed a heart in between the two birds, seems appropriate right?
I have really wanted to try the chalkboard technique that I have seen really pretty Christmas cards created with this technique, and I will try my hand with some Christmas stamps that I think will work quite well, but in the meantime, what to use for this wedding card. Well, I inked up a Memory Box medallion and heart die with PTI white snow (like a craft ink) and ran them thru the Cuttle bug with the spongey tan mat underneath all. I like the results, kind of how I hoped it would look. The congratulations sentiment from SU Bitty Banners finishes it off. Do you think I should add some white sequins?

I have used the Crate collection Sleigh Ride that I am using all up, such a different collection of themes and it is making me think outside of the box :))
I tried my hand agin with the chalkboard embossing technique (well I don't know if this is actually a technique...but I imagine that I am not the first to try this!) and the same MemoryBox die, but with some of the centers pushed out.
I made a circle frame on the front of my card and layered the backdrop with a very close to matching sage/teal linen texture card stock that I had in my stash. The little snowman is from the Crate collection as is the velum sentiment. I added the polka dotted washi tape that you have been seeing here of late (don't worry, it is a small roll :) to create a little balance and to add a little more of the drama with the black trees in the patterned paper. I am also offering this up for the Moxie Fab World Handmade Cards-Ready-Made Embellishments challenge.
This little cutie cupcake has been a favourite of mine since it first premiered at Ellen Hutson's way back when...a Karen Lockhart holly and berry cupcake stamp. I coloured with Copic markers, added some Sakura stardust garnet colour to the berries and framed up and then placed a MemoryBox die underneath. The chevron paper is from...you guessed it-Crate! and the sentiment is Papertrey Ink from the Love Lies Here Holiday version.
Thanks so very much for taking a peek and I have enjoyed all of the very, very sweet comments-Thanks so much!
hugs-Chriss
Sunday, October 6, 2013
MIM Together
Happy Sunday, a beautiful day here, clear, warm and dry.
I had some time to play for the Papertrey Ink
Make it Monday "repeat and lift" #134 challenge.
Nichole has a good video on the post with the all of the details.
I chose the together stamp and die cut for mine, using Hawaiian Shores and Chartreuse inks.
The red hearts were cut with a textured card stock that I had on hand and the patterned paper is PTI. A couple of Maya Road stick pins finish it off.
That's it, simple and colourful. Fun technique that I will be experimenting with in the near future! You should try it too :)
Thanks for taking the time to visit.
Chriss
I had some time to play for the Papertrey Ink
Make it Monday "repeat and lift" #134 challenge.
Nichole has a good video on the post with the all of the details.
I chose the together stamp and die cut for mine, using Hawaiian Shores and Chartreuse inks.
The red hearts were cut with a textured card stock that I had on hand and the patterned paper is PTI. A couple of Maya Road stick pins finish it off.
That's it, simple and colourful. Fun technique that I will be experimenting with in the near future! You should try it too :)
Thanks for taking the time to visit.
Chriss
Tuesday, June 7, 2011
Congratulatory Wedding Wishes
I had some time to create a wedding card today using Verve's Love Story and the congratulations is from Papertrey Ink's Boards and Beams set. This card is a try at the Papercrafts Gallery Idol. I have only ever submitted 3 cards for anything "designer" like and I am trying to get better about this, so...
I used a sheet of K and CO that I thought was so perfect for a wedding card, classic pattern and neutral colours, my kind of comfortable :)
I stamped and coloured the heart image from Verve and then stamped the sentiment in the middle. I popped this onto a beaded circle die cut that I made using PTI Vintage Linen card stock (I used this for the card base also). I added a few yellow Prima roses that go so well with the paper and also punched out some MS fronds and leaves in the linen cs and a kraft cs. The congratulations was stamped and trimmed off from the rest of the sentiment phrase and I sponged the edges in SU crumb cake ink (all of the edges on the card are sponged with this). The last little detail is the seam binding as my ribbon and I placed a bronze brad with a pearl center through the bow center.
Hope you have a great day and enjoy the summery weather!
Cheers,
Chriss
Sunday, November 28, 2010
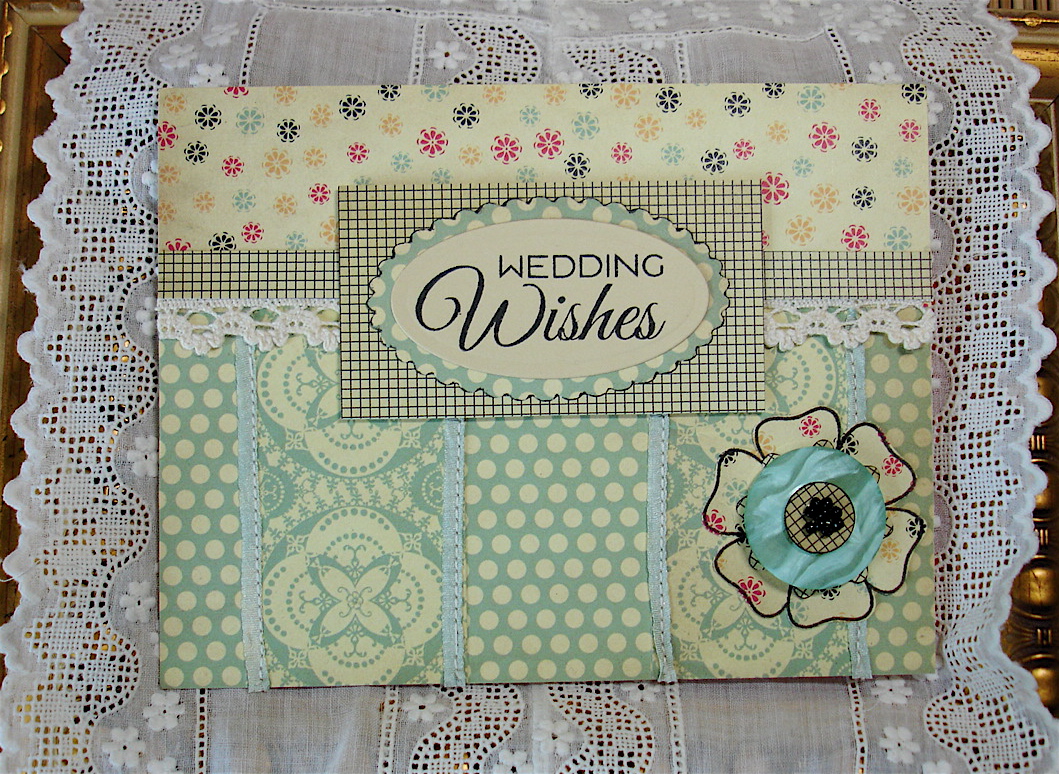
Wedding Wishes~Circa 1934
Hello everyone! Hope you weekend has been enjoyable so far. I have been making some challenge cards today and here is one of them. This one is for Card Patterns Sketch #92. I think this is such an interesting sketch, right up my alley.
I am so in love with this Circa 1934 Cosmo Cricket paper pad...I used it again today and it probably won't be the last time that you see it here :) I cut a couple of panels of this medallion pattern and placed on top of the pretty aqua polka dot paper and cut 4 strips of narrow silk ribbon that I have in my stash, sewed on and then added the multi colour teeny print to the top of the card and added a narrow strip of the tiny graph pattern and a length of lace. For my sentiment, I stamped this Verve Wedding Wishes from the Love Story on vintage lace card stock from PTI. I used the petite Spellbinders ovals to cut out and layered over a scalloped polka dotted one that I inked the edges with Memento Tuxedo black. I then layered with a rectangle of the same graph pattern. My flower is stamped directly onto the paper with Verve's flower from Great Friend and cut out. If you look closely, I layered a Spellbinders Flower shape cut out again using the graph pattern. The large button is from PTI and in the center I added a circle of the graph pattern paper and some black seed beads. I like how the Cosmo colours and the silk ribbon make this look like a vintage-y wedding card. This was such a fun sketch to work with! I will be adapting for some other cards for sure!
Thanks for taking a peek today,
Cheers!
Chriss
Wednesday, April 21, 2010
I keep making wedding cards!
Good morning! It is a beautiful sunny and warm morning here and I can't wait to get out in the garden. The weeds are calling ;)For the first one I used Card Patterns Sketch #60 again and this beautiful Pink Paislee patterned paper "Queen Bee" 6 X 6 paper pad. Love these colours and patterns and this was a really easy card to make using Spellbinder dies and an EK Success border punch. I added a sentiment that I stamped from the SU Fancy Flexible Phrases set and added a length of very vanilla taffeta ribbon over the scalloped borders. I also added 3 yellow paper "straw flowers".


For this second one, I used the same sketch and a variety of papers. K and CO (for the black bottom panel), MM for the circular and square and the green is Pink Paislee "Bayberry Cottage" The stamped mousie couple is another stamp from Stampavie entitled "Mice Kissing". I stamped the image twice, one on a vintage white cs from PTI and cut out just the tulip and mice part and again on a MM patterned black and white from the older Sabrina pack and I cut out the tulips to paper piece them. The mice were coloured with Copic markers and I popped them up on the "framed" center. The sentiment is from the same Fancy Flexible Phrases set and I used Spellbinder dies to cut these. I added a Sabrina ribbon around the front of the bottom panel and also used a couple of MS punches to create the greenery.

The last card uses the DCWV line of Cafe Mediterranean 8 X 8 paper (the glossy teal) and the whole mice couple is stamped, coloured and popped up on another piece of DCWV paper. I colored the image with Copics and also paper pieced these tulips with a scrap piece from the Sabrina line (I think)
The sentiment is the same and I added 3 tiny pearls to it and sponged the edges of the smallest mega scalloped Nestability die. I made the scalloped borders with an EK succes punch and the SU border punch was used for the black. All of these were layered and then a wide piece of white lace on top and finally the framed image.
Hope you have a wonderful day and thanks for taking a peek today!
Chriss


Thursday, April 15, 2010
My inchie bird couple

Good morning everyone! Still on the wedding kick and I made an inchie card for the Inchie Card Sketch #2 over on the Inchie Inklings blog! Oh how I love to use these tiny images :) This sketch was perfect for the card I had in mind (after I turned it on the side ;)! I like how
this card has a playful with a touch of elegance look to it and I love the neutral grey/yellow & creamy white colour combo. For some reason, I always tend to create wedding cards with grey in them. The birds are stamped, cut out and I used a buttermilk Spica pen on her flower and a pearl in the center and added black Spica to both of their wings. Quite hard to see in the photo, but sparkly in real life. I had so much fun making this and I am really looking forward to other inchie challenges!
The other card that I created is a sketch I made up as I created the card, just playing around with the Nestie pieces as I cut them. The background was created with the Damask CB folder and the two scallop borders were created with EK Success slim border punches. I used the SU Together Forever set...again. What can I say but when I like a set, I tend to hang onto it and use it a couple of times a year :)
Both cards use "La Creme" mat stack...I guess you can tell that I really like this one, and the paper flowers on both cards are from the Wild Orchid Crafts shop in the UK.
Here's a close-up of the border detail. Have a great day and thanks so, so much for stopping by again!
Wednesday, April 14, 2010
Wedding Day Woodcuts
Hello everyone!I just made a couple of wedding cards for the Card Patterns Sketch #59. I have kept both cards very simple and neutral in colour and used the same SU woodcut flower from the "Together Forever" set. Pearls were placed in the centers of the flowers and just below the PTI sentiment from Delightful Dahlia.
Thanks for taking a peek today,
Chriss
Tuesday, February 23, 2010
Happy, Joy birdies
Good Day everyone! It is snowing in Austin!!! Can you believe it?! All of the roof tops are covered. It looks like we got about 1 inch and it has stopped right now, but we will see what happens later ;)I made a card today and was able to combine two challenges. The PlayDateCafe#17 is a colour challenge, to use red, brown and linen...check. The sketch I used for this card is from the Card Patterns site and this is sketch #52. They are celebrating the 1st year anniversary.
Here is the card, another wedding/anniversary card made with the same two cute birds stamp from Hero Arts that I used yesterday.
They are coloured with Copics and have touches of
Spica Sparkle on them. She also has a tiny pearl in her hair flower piece.
Spica Sparkle on them. She also has a tiny pearl in her hair flower piece.This is the first time for me that I have made one of the scalloped/ruffled paper flowers. I like how it turned out in the red/brown combination. For the center, I used a metal flower brad and a pearl studded fabric covered brad that I removed the fastening part from the back. I also useda length of lace that I first gathered with a needle and thread and cinched into a circle.
Most of the edges of paper on the card are sponged with creamy caramel. Thanks for visiting!
Chriss
Friday, February 12, 2010
Simple and Romantic Wedding Bouquet
1 card, 2 challenges...I am still organizing my craft room, but really wanted to make this card for a couple of challenges that are nearing deadline.
The 1st challenge is to "make your very best wedding card" and have a chance at being published over on the Caardvarks blog here. I have only ever submitted for a publication 2 times...and no luck. Maybe third time is a charm? I know that I have read to keep submitting and it could take a long time to ever get selected, so I guess I have to be a little more persistent and patient ;)
The second challenge is a sketch challenge, # 153, over on the CardPositioning site here being sponsored by Papertrey Ink!!!
For my card I decided to use a beautiful JustRite image, newly released from the Breath of Spring collection. I am using them as Hydrangeas. (even though I know that they are violets! they have the same shaped petal so...let's just pretend) I started my card by stamping the image twice onto Papertrey Vintage Cream card stock in SU Always Artichoke. I then coloured with my Copic markers and cut out with the Spellbinder Label one die and I also embossed it. I used a chiffon Copic (one of the new lights from Copic that I just bought from Ellen Hutson)to colour the cream spaces on the embossed panel, taking care to follow along the edges.

I also coloured some extra flowers and cut them out and added dimensional foam to the backs and placed these in the bouquet adding some "Buttermilk" sparkle from a newly puchased Spica pen. I added some sparkle to the bouquet's ribbon too. The card base is made with Papertrey Ink Vintage Cream card stock and to the front of this I added a brown Bazzil textured layer and then a cream Bazzil textured layer. The designer paper front is a double sided sheet from K and Co. from a new (and gorgeous collection)designer mat pad from Tim Coffey. I cut the front panels to suit the square size I was making (5 1/4 square) and adhered to the front. Over that is a strip of the same Bazzil card stock

that I used the new SU punch on. I wrapped some lace around the strip and adhered to the card front. The rhinestones are a flower cluster that I cut up from a Say it in Crystals pack that I have been hoarding. I used these because they were a complimentary colour and a good size for the scale of the punched scallop. The edges of the main image was sponged in Ranger tea dye ink (as were the other designer paper edges)and placed onto a larger size Label one panel that I cut from another piece of the same K and Co. paper.
Hope you like the card, I had a lot of fun making it! I may have another post today...Have a great day! Thanks for visiting.
Subscribe to:
Posts (Atom)